FreeCodeCamp - JSON APIs and Ajax
Trigger Click Events with jQuery
通过jQuery来绑定点击事件。
首先,我们来看一下函数 $(document).ready() 干了些什么。
这个函数中的代码只会在我们的页面加载时候运行一次,确保执行js之前页面所有的dom已经准备就绪。
任务:给"Get Message"按钮绑定一个点击事件。
我们先在$(document).ready()函数中增加一个click事件。代码如下:$(document).ready()function by adding this code:
$("#getMessage").on("click", function(){
});
<script>
  $(document).ready(function() {
    // Only change code below this line.
    $("#getMessage").on("click",function() {});
    // Only change code above this line.
  });
</script>


<div class="container-fluid">
  <div class = "row text-center">
    <h2>Cat Photo Finder</h2>
  </div>
  <div class = "row text-center">
    <div class = "col-xs-12 well message">
      The message will go here
    </div>
  </div>
  <div class = "row text-center">
    <div class = "col-xs-12">
      <button id = "getMessage" class = "btn btn-primary">
        Get Message
      </button>
    </div>
  </div>
</div>
Change Text with Click Events
通过点击事件来更改文本。
当我们点击按钮时,我们可以更新HTML页面
任务:点击"Get Message"按钮,将class为message 的元素的文本改为:“Here is the message”。
为此在我们的点击事件中加入如下代码:
$(".message").html("Here is the message");
<script>
  $(document).ready(function() {
    $("#getMessage").on("click", function(){
      // Only change code below this line.
      $(".message").html("Here is the message");
      // Only change code above this line.
    });
  });
</script>


<div class="container-fluid">
  <div class = "row text-center">
    <h2>Cat Photo Finder</h2>
  </div>
  <div class = "row text-center">
    <div class = "col-xs-12 well message">
      The message will go here
    </div>
  </div>
  <div class = "row text-center">
    <div class = "col-xs-12">
      <button id = "getMessage" class = "btn btn-primary">
        Get Message
      </button>
    </div>
  </div>
</div>
Get JSON with the jQuery getJSON Method
当你需要根据服务器返回的数据来动态改变页面的时候,应用程序接口(API)就派上用场了。
记住,API——应用程序接口(Application Programming Interface)是计算机之间相互交流沟通的工具。
许多网站的应用程序接口(API)都是通过一种称为JSON格式的数据来传输的,JSON 是 JavaScript Object Notation的简写。
其实如果你曾经创建过JS对象的话,你就已经使用了这种数据格式,JSON是一种非常简洁的数据格式。
它通常表现为了两种形式,一种为单个对象,一种为多个对象
单个对象类似于:
{name:'盖伦',advantage:'单挑无敌'}
多个对象类似于:
[{name:'盖伦',advantage:'单挑无敌'},{name:'诺克',advantage:'上单霸主'}]
每个对象属性和属性值的组合就是我们经常听到的"键值对(key-value pairs)"。
让我们从之前的猫图API拿取数据吧。
你应该在你的点击事件中加入如下的代码:
$.getJSON("/json/cats.json", function(json) {
$(".message").html(JSON.stringify(json));
});
在这之后,点击"Get Message"按钮。你的Ajax函数将把文字"The message will go here"替换成此从FreeCodeCam的猫图API中获得的原始JSON数据。
<script>
  $(document).ready(function() {

    $("#getMessage").on("click", function(){
      // Only change code below this line.
      $.getJSON("/json/cats.json",function(json) {
        $(".message").html(JSON.stringify(json));
      });


      // Only change code above this line.
    });

  });
</script>

<div class="container-fluid">
  <div class = "row text-center">
    <h2>Cat Photo Finder</h2>
  </div>
  <div class = "row text-center">
    <div class = "col-xs-12 well message">
      The message will go here
    </div>
  </div>
  <div class = "row text-center">
    <div class = "col-xs-12">
      <button id = "getMessage" class = "btn btn-primary">
        Get Message
      </button>
    </div>
  </div>
</div>
Convert JSON Data to HTML
好了,我们已经从JSON API中获得了数据,现在把它们展现到我们的HTML页面中吧。
这里,我们使用.forEach()函数来循环遍历JSON数据写到htmll变量中。
首先我们定义一个HTML变量,
var html = ""; 。
然后,我们使用.forEach()函数来循环遍历JSON数据写到html变量中,最后把html变量显示到我们的页面中。
整个过程的代码如下:
json.forEach(function(val) {
var keys = Object.keys(val);
html += "<div class = 'cat'>";
keys.forEach(function(key) {
html += "<b>" + key + "</b>: " + val[key] + "
";
});
html += "</div>
";
});
提示:示例中难点在于两个forEach循环,而且里面夹杂有字符串拼接,这是最头疼也最容易出错的地方。
<script>
  $(document).ready(function() {

    $("#getMessage").on("click", function() {
      $.getJSON("/json/cats.json", function(json) {

        var html = "";
        // Only change code below this line.
        json.forEach(function(val) {
          var keys = Object.keys(val);
          html += "<div class = 'cat'>";
          keys.forEach(function(key) {
            html += "<b>" + key + "</b>: " + val[key] + "<br>";
          });
          html += "</div><br>";
        });


        // Only change code above this line.

        $(".message").html(html);

      });
    });
  });
</script>

<div class="container-fluid">
  <div class = "row text-center">
    <h2>Cat Photo Finder</h2>
  </div>
  <div class = "row text-center">
    <div class = "col-xs-12 well message">
      The message will go here
   </div>
  </div>
  <div class = "row text-center">
    <div class = "col-xs-12">
      <button id = "getMessage" class = "btn btn-primary">
        Get Message
      </button>
    </div>
  </div>
</div>
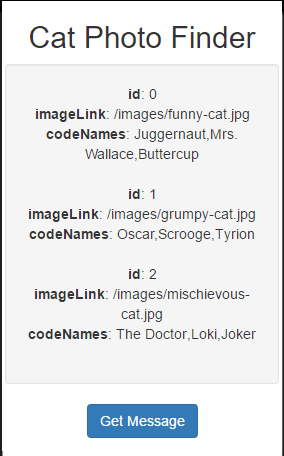
显示是这样的。
Render Images from Data Sources
从上节课获得的JSON数组中,每个对象都包含了一个以imageLink为键(key),以猫的图片的url为值(value)的键值对。
当我们在遍历这些对象时,我们用imageLink的属性来显示img元素的图片。
代码如下:
html += "<img src = '" + val.imageLink + "'>";
<script>
  $(document).ready(function() {

    $("#getMessage").on("click", function() {
      $.getJSON("/json/cats.json", function(json) {

        var html = "";

        json.forEach(function(val) {

          html += "<div class = 'cat'>";

          // Only change code below this line.

          html += "<img src= '"+val.imageLink+"'>"

          // Only change code above this line.

          html += "</div>";

        });

        $(".message").html(html);

      });
    });
  });
</script>

<div class="container-fluid">
  <div class = "row text-center">
    <h2>Cat Photo Finder</h2>
  </div>
  <div class = "row text-center">
    <div class = "col-xs-12 well message">
      The message will go here
    </div>
  </div>
  <div class = "row text-center">
    <div class = "col-xs-12">
      <button id = "getMessage" class = "btn btn-primary">
        Get Message
      </button>
    </div>
  </div>
</div>
Prefilter JSON
如果我们不想把所有从JSON API中得到的图片都展现出来,我们可以在遍历之前做一次过滤。
我们把其中 "id" 键的值为1的图片过滤掉。
代码如下:
json = json.filter(function(val) {
return (val.id !== 1);
});
<script>
  $(document).ready(function() {

    $("#getMessage").on("click", function() {
      $.getJSON("/json/cats.json", function(json) {

        var html = "";

        // Only change code below this line.

        json = json.filter(function(val) {
          return (val.id !== 1);
        })

        // Only change code above this line.

        json.forEach(function(val) {

          html += "<div class = 'cat'>"

          html += "<img src = '" + val.imageLink + "'>"

          html += "</div>"

        });

        $(".message").html(html);

      });
    });
  });
</script>

<div class="container-fluid">
  <div class = "row text-center">
    <h2>Cat Photo Finder</h2>
  </div>
  <div class = "row text-center">
    <div class = "col-xs-12 well message">
      The message will go here
    </div>
  </div>
  <div class = "row text-center">
    <div class = "col-xs-12">
      <button id = "getMessage" class = "btn btn-primary">
        Get Message
      </button>
    </div>
  </div>
</div>
Get Geolocation Data
我们还可以通过浏览器navigator获得我们当前所在的位置geolocation。
位置的信息包括经度longitude和纬度latitude。
你将会看到一个是否允许获取当前位置的提示。不管你选择允许或者禁止,只要代码正确,这关就能过了。
如果你选择允许,你将会看到右侧手机输出的文字为你当前所在位置的经纬度。
代码如下:
if (navigator.geolocation) {
navigator.geolocation.getCurrentPosition(function(position) {
$("#data").html("latitude: " + position.coords.latitude + "
longitude: " + position.coords.longitude);
});
}
<script>
  // Only change code below this line.
  if (navigator.geolocation) {
    navigator.geolocation.getCurrentPosition(function(position) {
      $("#data").html("latitude: " + position.coords.latitude + "<br>longitude: " + position.coords.longitude);
    });
  }


  // Only change code above this line.
</script>
<div id = "data">
  <h4>You are here:</h4>

</div>
效果如上。
(完)
